! Home
| Steam Mops
| Koi Guru Center
| Electric Dog Fences
| CLP Digital Pianos
| Vacuum Cleaner
| 49rc.com
!
Tuesday 22 November 2011
Tuesday 15 November 2011
Saturday 12 November 2011
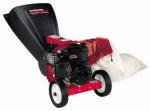
Yard Machines 24A-452G700 205cc Briggs & Stratton 800 Series Gas-Powered Chipper Shredder
!: discounted Yard Machines 24A-452G700 205cc Briggs & Stratton 800 Series Gas-Powered Chipper Shredder Order Now
Brand : Yard Machines | Rate :  | Price : $523.69
Post Date : Nov 13, 2011 04:54:03 | Usually ships in 4-5 business days

| Price : $523.69Post Date : Nov 13, 2011 04:54:03 | Usually ships in 4-5 business days
Yard Machines, Stationary Chipper/Shredder, 205CC, Briggs & Stratton 800 Series OHV Engine, 8.00 Ft.-Lbs. Gross Torque Rating, 2' Chipper Capacity, 10:1 Debris Reduction Ratio, 2.5 Bushel Bag Capacity, Poly Drop-Down & Rake-In Hopper, 3-Way Feed System, Steel Chipper Blade, 10' Wheels, 2 Year Limited Warranty.
More Specification..!!
Thursday 10 November 2011
Monday 7 November 2011
Saturday 5 November 2011
Factory Reconditioned Ryobi ZR08510 25.4cc Gas-Powered Variable-Speed Hand-Held Blower/Vacuum/Mulcher
!: Shop Factory Reconditioned Ryobi ZR08510 25.4cc Gas-Powered Variable-Speed Hand-Held Blower/Vacuum/Mulcher buy

Brand : Ryobi | Rate : | Price : $69.99
Post Date : Nov 05, 2011 11:57:16 | Usually ships in 1-2 business days
| Price : $69.99Post Date : Nov 05, 2011 11:57:16 | Usually ships in 1-2 business days
This is a factory reconditioned product. Reconditioned generally means that the product has been returned to the manufacturer, who brings the product back to like new condition. Some products may contain cosmetic blemishes. Includes 25.4-cc Gas Powered Variable Speed Hand Held Blower/Vacuum/Mulcher - ZR08510, Upper Blower Tube, Sweeper Nozzle, High Velocity Nozzle, Vacuum Handle, Vacuum Handle Knobs, Upper and Assembly, Vacuum Bag Adaptor, Operators Manual
More Specification..!!
Wednesday 2 November 2011
Subscribe to:
Posts (Atom)
|
|
|
|
|
 |
 |
 |
 |
 |
 |
 |
 |
Sponsor Links
- Cheap GPS Navigation System
- Great Deal Sale
- Products Discount Today
- Coach Gift Cards Order Now
- Deluxe Neoprene Black Wide Neck Strap For The Fuji Finepix F500 Exr, ... Refurbished
- Tigi Eco Awesome Shampoo 25.36 Oz.... Sale Off
- Adobe Photoshop Software Free On Sale
- Alpen 10x42 Magnaview Series Water Proof Roof Prism Binocular With 5.6 De... On Sale
- Wholesale Solar Trickle Charger For Car Battery
- Saving Goodyear Comfort Tread